How to Create a Bootable Usb to Install Windows 10
How to Create Bootable USB For Windows 10 Install.wim Larger Than 4GB
The days of burning operating system ISO images to a disc are long gone. Today most PCs can boot from USB so it's just easier to update and more convenient to install Windows from a USB flash drive. Another good reason to install this way is the installation speed, which is significantly faster than setup running from an optical drive. Many modern devices do not come with an optical drive.
There are a number of methods we have already covered here, including Rufus for UEFI, the classic DiskPart, and PowerShell.
However, if you have an install.wim file in your Windows 10 distribution which is larger than 4GB in size, you may need to take extra steps to create a bootable USB drive. Your flash drive must have two partitions instead of the single one.
- One of them must be formatted in FAT32. This will allow you to use the flash drive for both classic BIOS and modern UEFI devices.
- The second one must be formatted in NTFS. It will be able to store large files.
Before proceeding, backup any important data from you flash drive. The procedure will erase all files and folders from it.
The steps below assume that you already have a Windows distro, and you are able to mount it in order to copy its files.
To Create Bootable USB For Windows 10 Install.wim Larger Than 4GB,
- Connect you flash drive to the computer.
- Press Win + R on your keyboard and type
diskpartinto the Run box. Hit the Enter key. - In the DiskPart console, type
list disk. It will show a table with all your disks, including the currently connected USB stick. Note the number of the USB stick drive. For example, it is Disk 1.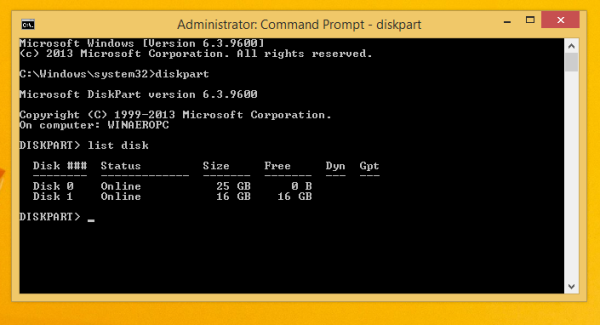
- Type
sele disk #,where # is the number of your USB stick drive. For our example the commands issele disk 1. - Type
cleanto erase the drive contents. - Type
create partition primary size=1000to create a new partition of 1GB. - Type create partition primary to create yet another partition that will take the rest of the remaining drive space.
- Type
select partition 1to select the first (1GB) partition. - Format it in FAT32 as follows:
format fs=fat32 quick - Assign it the X letter:
assign letter=X. - Make it bootable with the command
active. - Now, select the second partition:
select partition 2. - Format it in NTFS:
format fs=ntfs quick. - Assign the Y letter to the second partition with the command:
assign letter=Y. - Leave DiskPart with the command
exit.
You are done with the flash drive layout. The drive X: is a bootable small partition, and the drive Y: is a large NTFS partition to host the install.wim file. Now, let's copy Windows files properly.
Copy Windows Setup Files
- Open your Windows setup files in File Explorer.
- Copy everything except the
sourcesfolder to theX: drive(the FAT32 one). - Copy the sources folder to the
Y: drive(the NTFS partition). - On the X: partition, create a new
sourcesdirectory. It will contain a single file,boot.wim. - Copy
boot.wimfromY:\sourcestoX:\sources. - In the
Y:\sourcesfolder, create a new text file with the following contents:[CHANNEL]
Retail - Save it as
ei.cfg.
You are done. We have created 2 partitions: A FAT32 partition (X:) and an NTFS partition (Y:). We have placed the sources folder on Y:. On X: we store everything else of the original distro. We have also created a new sources folder on X: with a single file BOOT.WIM. The last step is required to start the setup program when booting from our USB drive.
Now you will be able to install Windows using the flash drive you just created without reducing the install.wim file size. This is useful when you have a customized large install.wim file.
That's it.
Support us
Winaero greatly relies on your support. You can help the site keep bringing you interesting and useful content and software by using these options:
If you like this article, please share it using the buttons below. It won't take a lot from you, but it will help us grow. Thanks for your support!
How to Create a Bootable Usb to Install Windows 10
Source: https://winaero.com/create-bootable-usb-for-windows-10-install-wim-larger-than-4gb/